Get precise AI image edits every time. Use the Nano Banana Canva workflow with visual prompts to eliminate guesswork and scale creative production.
Why Text‑Only Prompts Fail at Spatial Precision
If you've ever told an AI to "change the shirt" and it cheerfully recolored the sky, you've hit the classic spatial ambiguity problem. Text alone doesn't tell an AI image model exactly where to look, so it guesses—often incorrectly. That guesswork is costly during November's sprint toward Black Friday and holiday campaigns when every revision cycle steals time and budget.
The solution is a no‑code, production‑friendly system: the Nano Banana Canva workflow. By marking up your image in Canva with bright, consistent highlights and micro‑instructions, then feeding both image and a universal prompt to Nano Banana (Gemini 2.5 Flash Image), you fuse visual cues with text intent. The result is precise, predictable AI image editing that scales.
If the model can see your intent, it can obey your intent.
What's happening under the hood
Modern vision‑language models align words with pixels using attention maps. When you overlay clear, high‑contrast boxes and concise notes, you guide that attention so the model "locks onto" the relevant regions. This eliminates drift, boosts consistency, and cuts down on trial‑and‑error—exactly what teams need in a high‑velocity creative calendar.
The Canva‑to‑Nano Banana Workflow: Step by Step
This repeatable workflow removes ambiguity and makes revisions fast.
Before you start
- Choose a high‑resolution base image (at least 2048 px on the long edge).
- Pick a single annotation color and stick to it. Neon pink works well because it rarely conflicts with brand palettes.
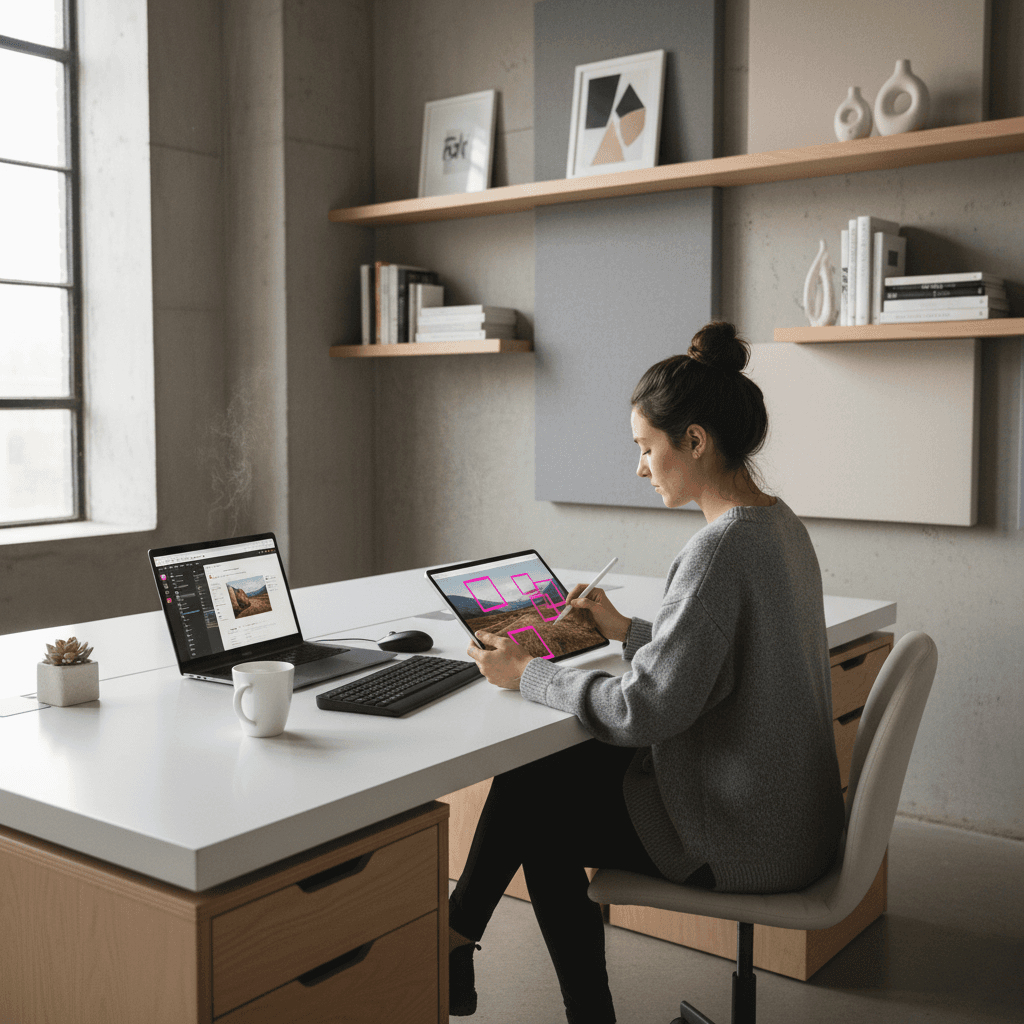
Step 1: Mark up in Canva
- Duplicate your base image on a new page to preserve a clean original.
- Draw bright pink rectangles around each region to edit. Keep boxes tight with a small margin.
- Add short labels next to each box: "1: change shirt to forest green cotton," "2: remove watch," "3: lighten shadows 10% on face."
- Keep instructions atomic—one action per box—to simplify model reasoning.
Pro tip: Use outlined boxes (stroke only, no fill) to avoid blocking important pixels the model needs to understand context.
Step 2: Export your annotated image
- Export as PNG at full resolution. Name it
filename_annotated_v1. - Keep the original clean image handy for final compositing if needed.
Step 3: Upload to Nano Banana (Gemini 2.5 Flash Image)
- Select the Gemini 2.5 Flash Image model for speed and strong instruction adherence.
- Upload the annotated image as the primary input.
- If your platform allows multiple inputs, you can also attach a style or color reference image (see Advanced Moves below).
Step 4: Paste the universal prompt
Use the template in the next section. It tells the model exactly how to treat the boxes and labels.
Step 5: Review and iterate
- If an edit is slightly off, nudge with one‑line clarifications: "Box 1: make green darker, hex #2A4F3C."
- If multiple edits interact (e.g., color casting versus shadow changes), run them in two passes: color first, cleanup second.
The Universal Prompt: Make Visual Instructions Stick
A single, reusable prompt can standardize results across your team and projects.
Copy‑and‑use template
Paste this into Nano Banana with your annotated image:
"Follow the visual instructions exactly. The bright pink boxes indicate the regions to edit. The short text near each box describes the action. Apply only the specified changes inside each boxed region. Do not modify unboxed areas. Preserve composition, lighting, and overall style unless an instruction says otherwise. Remove all annotations in the final output. If any instruction is ambiguous, ask a clarifying question before proceeding."
Example with numbered actions
When you label boxes in Canva, keep text concise so the model can parse it easily:
- 1: Change shirt to forest green cotton, matte texture, natural folds.
- 2: Remove watch; restore skin and sleeve naturally.
- 3: Lighten facial shadows by ~10%, avoid flattening contrast.
- 4: Keep background sky unchanged.
Small, explicit rules drive big gains in accuracy. You're effectively doing visual prompt engineering—telling the model what to do and where to do it.
Advanced Moves: Layers, References, and Templates
Use these techniques to unlock enterprise‑grade consistency.
Multi‑layer or staged edits
- Dependency order: Do structure changes (remove/replace) before color and exposure tweaks.
- Complex composites: If you're adding elements, run a first pass to place them, then a second pass for color matching and shadow integration.
- Consistency pass: End with a global "unify color temperature and grain" instruction to blend edits seamlessly.
Style and color reference images
Attach a reference image and extend the universal prompt:
"Match Box 1's green to the dominant jacket color in the reference image. Respect material qualities (matte vs. satin). Keep skin tones natural."
Use cases:
- Product recolors that match exact brand swatches.
- Beauty and fashion shoots where fabric sheen matters.
- Seasonal palettes (e.g., deep evergreen and metallic gold for holiday sets).
Reusable Canva templates for teams
Create a simple "Annotation Kit" in Canva:
- Locked header explaining annotation rules.
- Pre‑made magenta stroke boxes and numbered labels.
- A micro‑legend: "Pink box = edit region; label = action; final must remove annotations."
- Naming convention suggestions:
project_item_annotated_v#.
Templates reduce onboarding time for editors and keep your AI workflow consistent across designers, agencies, and freelancers.
Quality and compliance guardrails
- Add a line in your prompt: "Do not alter logos, legal disclaimers, or safety information."
- For marketplace compliance, specify background requirements (e.g., "keep background pure white, RGB 255/255/255" or "retain natural shadow").
Use Cases and ROI: From Holiday Ads to Product Pages
It's November, which means creative teams are compressing months of iteration into days. This workflow helps you move fast without sacrificing control.
Seasonal campaigns and paid media
- Generate on‑brand variants for Black Friday/Cyber Monday ads: button color changes, product recolors, and background theme swaps—without touching unboxed areas.
- Create geo‑personalized assets by swapping localized elements (currency signage, packaging copy) inside strict regions.
Ecommerce and marketplace imagery
- Recolor SKU photos realistically while preserving material and stitching detail.
- Remove props or price tags from tight regions without disturbing product edges.
- Standardize hero shots with precise exposure tweaks and consistent shadows.
Social content and creator workflows
- Rapid A/B test thumbnails by changing only the focal object or accent color.
- Maintain creator identity while adjusting makeup tone, garment color, or background set pieces inside controlled boxes.
Expected efficiency gains
Teams using visual prompts commonly report:
- Fewer prompt retries and faster approvals.
- Predictable, brand‑safe edits that reduce manual retouch cycles.
- A repeatable, no‑code AI workflow anyone on the team can run.
Troubleshooting and Best Practices
Keep control high and surprises low with these guardrails.
Annotation rules of thumb
- Use one color for all boxes—neon pink is ideal for contrast.
- Keep labels short: "verb + object + attribute," e.g., "change shirt to navy cotton."
- Avoid covering key edges with thick strokes; use 3–6 px outlines.
- Number your boxes in the order you want edits applied.
Prompting refinements
- Add: "Only modify pixels inside boxed regions. Ignore backgrounds unless boxed."
- Add: "If uncertain, ask one clarifying question."
- Add: "Deliver final without overlays or artifacts."
When results drift
- Tighten boxes; overly large regions encourage over‑editing.
- Split complex actions into two passes.
- Provide a reference image for color/material fidelity.
- Specify texture words: "matte," "satin," "brushed metal," "chunky knit."
Conclusion: Visual Prompts Are Your Competitive Edge
Text‑only prompting leaves too much to chance. The Nano Banana Canva workflow brings precision to AI image editing by pairing clear visual markup with a universal instruction template. It solves spatial ambiguity, reduces rework, and gives you production‑ready results—exactly when your team needs speed and control most.
If you want our ready‑to‑use Canva annotation template and the universal prompt as a copy‑paste card, reach out to request the pack. Ready to scale this across your team? Book a quick workflow audit and we'll tailor the Nano Banana Canva workflow to your brand system.
The next creative sprint is already here. Will your AI follow directions—or keep guessing?